I could kill myself for starting this project when I am the worlds worst at measuring.
I found this amazing fabric that I posted about in my last posting. Except it was almost 30 dollars a yard. If I had made my curtains fully out of that with lining they would have been like $225 dollars. I wasn't sure I trusted myself with that much money attached to my sewing machine so I opted to take another route. My sister bought some panels from Pier One a couple of years ago for her office and when she got them home they weren't nearly long enough. Her mother in law is a sewer and came up with this for her:

So I copied.
I did not take pictures step by step of me making these and believe me, you could thank me because I'm sure I didn't do them the right way.
Here are some pictures of the transformation.


Here is the first curtain unhemmed and without trim. Basically I took 3 yards of burlap went around the outline of the burlap and ironed down an inch hem, then went back around and ironed that 1 inch hem folded over.
After that was completed. I took a piece of liner that was the same size and tucked the liner under the burlap hems and pinned. Then I sewed around the perimeter of the burlap piece.
Once that was completed I laid the burlap piece right side up and pinned the patterned fabric to the burlap so that its finished size would be 20" long. I sewed around the edge of the patterned fabric.
To create the pleats at the top of the curtain I literally just folded 3 pieces of the fabric to make a fan-like area on the curtain and pinned. I then sewed an "L" shape into the fabric. (If anyone has specific questions as to what this looks like up close I'll be glad to take pictures.)
Then I hemmed and added the trim like so:

Here's where the problem started. I have to make another curtain JUST like the first one. HAHA.
After measuring and measuring and pinning it still turned out to be wrong. To the naked eye I rigged it to be so-so, but when you pull out your yard stick you can blatantly see that the first curtain's patterned fabric area is longer than the second's.

So If you look you will notice that at first the curtain on the right was too long, then I over corrected and now its a smidge too short. I'm throwing my hands up and giving myself an A for effort because I cannot sew anymore this week. My back is killing me and I'm seriously considering cleaning out my only guest room and turning it into our "hobby room". I don't think I can sew one more thing at my coffee table.
-Caren


 So I copied.
 Here is the first curtain unhemmed and without trim. Basically I took 3 yards of burlap went around the outline of the burlap and ironed down an inch hem, then went back around and ironed that 1 inch hem folded over.
 Here's where the problem started. I have to make another curtain JUST like the first one. HAHA.
 So If you look you will notice that at first the curtain on the right was too long, then I over corrected and now its a smidge too short. I'm throwing my hands up and giving myself an A for effort because I cannot sew anymore this week. My back is killing me and I'm seriously considering cleaning out my only guest room and turning it into our "hobby room". I don't think I can sew one more thing at my coffee table.
 Well apparently having supper club at our house later this month has gotten my butt in gear with getting things done around the house (the bar, some deep cleaning, getting my portrait framed, some new curtains and now this).
 And only have 1 more back and the bench seat to finish! Look for an updated outside picture of it all at the end of next week!
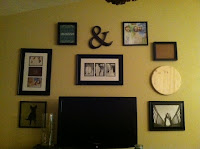
 It started out to be more symmetrical but I've been told that I need to step outside of my box in the den and add some funkyness. As you will see even with a design, the way it looks on the wall isn't quite to scale but I think I did an okay job.


 There will definitely be some changes along the way and maybe some additions. If you have a gallery wall in your home, share your ideas!
 The artwork on the top left hand corner with the dates was also inspired by Pinterest and was designed by my friend Tracy Woodard! The bottom silhouette of my dear Polly (a 4 lb chihuahua) was done by Deidre, the art director at the company that I work for. The rest of the pictures are just some black and whites on the day of our wedding. I have lots more to fill up so I'm getting nervous about getting it all done before we host our supper club at our house but I digress. On to the project....
 As you can see in this picture I have already hammered nails in around the outline of the state.
 I added a heart around Florence/Darlington where we live like so:
 Once I painted it black and it dried I chose a starting point on one of the outside nails of the state outline. I wove the yarn from a nail in the outline of the state and wound it around one of the heart nails one after another until I worked myself all the way around the outline of the state. One thing I would change is making the heart bigger to make a bigger working area. Especially when using a thick yarn like I did instead of a string.
 I knew as soon as I saw it I could make something similar for more than half of that $65 price tag. So I headed on up to the local Hobby Lobby and bought different colored spools of tulle as well as a bundle of fabric in different patterns.
 Tiff agreed that the one at the very top would be a cute number 3 applique on a top for her. That way, it wasn't birthday themed and she could wear the top more than just once.
 One by one I would take a color and tie it to the elastic like so:
 Once I finished about a fourth of it, it looked like this:
 It was really time consuming but a super easy project for all of you mom's to little girls! Here is the finished product.
 Stay tuned on how I put the applique on her shirt as well as her birthday girl pictures!